The Ultimate Guide to RV Lithium Battery Replacement

Are you having problems with the performance of your RV's electrical system? Are you tired of the constant maintenance of lead batteries? Perhaps you have just bought a used RV and are unsure about the condition and care of the on-board batteries by the previous owner.
Upgrading and replacing your RV lithium battery could be the perfect solution. Not only will it make your RV more efficient, but it will also save you time and money in the long run.
In this guide, we will walk you through the process of upgrading and replacing your motorhome battery and help you make an informed decision and ensure a smooth transition to a more reliable power source.
Important points:
- Battery types and functions: Learn about the different types of RV batteries and their features so you can make an informed decision when replacing or upgrading.
- Signs of battery failure: Watch for signs of RV battery failure, such as dim lights, sluggish appliances, voltage differences, and abnormal electrolyte levels.
- Proper handling and installation: Dispose of old batteries properly, take necessary precautions during installation, and monitor and maintain new batteries regularly.
- Consider lithium batteries: Invest in lithium batteries (LiFePO4)to achieve optimal performance and long-term value.
Part 1. Types of RV Batteries
Before upgrading or replacing your RV lithium battery, familiarize yourself with the different types of RV batteries on the market. Each type has its own advantages and disadvantages, so it's important to know which battery best suits your needs and preferences.
In the following section we will examine this:
- lead-acid battery
- annual general meeting
- gel
- lithium
1. Lead-acid battery
Lead-acid batteries are the cheapest option and last the longest, making them the tried and tested choice for many RV owners. Typically 12V technology is used, but some home batteries are also available in 6V technology, especially in older RV systems.
However, the low price means frequent maintenance and limited capacity. These batteries require regular checks of electrolyte levels and are susceptible to damage from overcharging or discharging, making them less suitable for those who prefer a low-maintenance lifestyle. You also need to worry about battery acid leakage and corrosion of battery terminals, and avoid damage by keeping the depth of discharge to less than 50%.
2. AGM battery
Absorbed Glass Mat (AGM) batteries are a more advanced type of lead-acid battery that offers several advantages over traditional lead-acid batteries. They seal well, don't leak, and don't require maintenance, making them an attractive option for those who like to take care of their batteries without a lot of hassle.
In addition, AGM batteries last longer and charge faster than lead-acid batteries. They can be installed in different orientations and have a slightly deeper depth of discharge (60% compared to 50% for conventional lead-acid batteries). However, these advantages come at the cost of a higher price and weight.
3.gel battery
Gel batteries are another type of sealed lead-acid battery that uses a gel-like electrolyte instead of a liquid, making them maintenance-free and spill-proof. Gel batteries are known for their resistance to shock and vibration, and are a good choice for RV owners who often drive over rough terrain.
In addition, gel batteries have a longer charge life than AGM batteries. However, gel batteries have their limitations, especially when compared to lithium batteries, which last longer and require less maintenance.
4. Lithium battery (LiFePO4 battery)
For those looking to upgrade their RV battery, lithium batteries are a popular choice due to their numerous benefits. Lithium batteries last longer, are lighter, and charge more efficiently than other battery types, making them an excellent long-term investment.
Plus, you don't have to worry about damage when the battery runs out, and they charge much faster than other types of batteries. Lithium batteries have a built-in battery management system (BMS)that protects the battery and devices from overcharging and undercharging.
However, the higher upfront cost may deter some RV owners from making the switch. They also cannot be charged in sub-zero temperatures. Despite the high cost, many people find that the benefits far outweigh the initial cost due to the long-term value of lithium batteries.
At Timeusb we only manufacture and sell the highest quality RV Lithium batteries because we know they are the best for any RV application. Learn more about Timeusb motorhome lithium battery.

Part 2. Signs of defective batteries
1. Voltage test
To assess the condition of a potentially defective deep cycle battery, you can perform a voltage test using any DC compatible voltmeter. A fully charged 12V deep cycle battery will typically have a voltage in the range of 12.8V to 13V. Conversely, a defective battery will usually read less than 10V, especially after a long charge, indicating that the battery is nearing the end of its useful life.
Regularly monitoring the voltage level of deep cycle batteries is crucial for proper maintenance and long life. A significant drop in voltage indicates that the battery needs to be recharged or replaced.
2. Capacity test
Capacity testing involves discharging the battery at a constant rate and measuring the time it takes to reach a certain voltage. This test helps determine the overall capacity and condition of the battery. If the battery's capacity is significantly less than its rated capacity, this may be a sign of battery deterioration.
3. Visual inspection
Inspect the battery for signs of physical damage, such as corroded terminals, swollen casings, or leaking electrolyte. These visual signs may indicate an internal problem with the battery and should not be ignored.
4. Load test
During a stress test, a load is applied to the battery and the voltage is observed under load. A healthy deep cycle battery should have a relatively stable voltage under load.If the voltage drops significantly during a load test, this may be an indication that the battery is unable to deliver its rated capacity.
What are the causes of deep cycle battery failure?
Deep cycle batteries are designed to withstand frequent deep discharges, making them ideal for renewable energy systems. However, there are several factors that can cause deep cycle batteries to age and fail if not handled properly.
- Overload: Overcharging is a common cause of damage to deep cycle batteries. This occurs when a battery is connected to a charger for a long period of time or is charged with too high a charging voltage. This increases the temperature of the battery's electrolyte solution, which can cause irreversible damage. To avoid overcharging, use a charger designed for deep cycle batteries and strictly follow the manufacturer's charging instructions.
- Sulfation: Sulfation occurs when a battery is left inactive and uncharged for long periods of time. This causes crystals to form on the plates, weakening their ability to hold a charge and eventually causing the battery to fail. Regular charging, even with infrequent use, is crucial to preventing sulfation and maintaining battery performance.
- Unloading practices: Although deep cycle batteries are designed to be discharged regularly, excessively deep or frequent discharges can affect their lifespan and performance. Although they are designed to be discharged deeply, the lifespan of a battery is shortened if it is discharged beyond about 50% of its capacity. Rapid and continuous discharge without sufficient charging or rest breaks can cause the electrolyte solution to overheat, resulting in permanent damage.
It is important to note that discharging more than 50% will significantly reduce the life of the battery and may cause permanent damage. While some batteries can be safely discharged to 80%, they tend to be more expensive and harder to obtain.
Proper maintenance of your deep cycle batteries ensures their long-term functionality and reliability and ensures consistent performance over a long period of time.
Part 3. Preparations for replacing the motorhome lithium battery
When replacing an RV battery, proper preparation will ensure the process goes smoothly. Here's what you need to do before you begin:
1. Required tools and materials
To successfully replace your RV battery, you should have the following tools and materials ready:
- New RV batteries
- Wrench or socket set for removing the battery cables
- battery terminal cleaner or wire brush
- Battery terminal protection or dielectric grease
- protective gloves and safety glasses
- Battery strap or bracket (if required)
- Battery charger or jumper cables (optional, for charging or starting a new battery)
- Additional battery cables and wires
Having these items on hand will make replacement easier and ensure safety.
2ndNote your current battery settings
Before removing the old battery, you should note your current settings:
- Take a photo or create a diagram to document how the cables are connected.
- Make note of important details such as the age of the battery and the date of the last service.
- Make note of any specific maintenance requirements or recommendations.
This document can be used as a reference during installation to ensure that everything is connected correctly.
3. Replacing and upgrading your RV lithium battery
Proceed with battery replacement using the required tools and setup documents:
1) Disconnect the old battery
- Turn off all power sources connected to the battery (shore power, generator, solar panel).
- Use a socket wrench or pliers to disconnect the negative terminal (black) first and then the positive terminal (red).
- Be careful to avoid sparks or accidents; consider using a battery disconnect switch.
2) Remove old battery
- Carefully remove the old battery from the battery compartment or battery box.
- When handling heavy batteries, use a harness or get help to avoid injury.
- Set the old battery aside for proper disposal later.
3) Clean and prepare the battery compartment
- Use a damp cloth to remove dirt and debris from the battery compartment.
- Check the battery compartment for corrosion, damage, or loose connections; correct any problems immediately.
- Make sure the compartment is prepared to accommodate new batteries to maximize performance and longevity.
4) Replace with new battery
- Insert the new battery into the battery compartment and make sure it is firmly seated.
- Reconnect the battery cables according to the recorded settings: start with the positive terminal (red), then the negative terminal (black).
- Carefully check all connections for safety and tightness.
- Close the battery compartment and reopen any power switches that were previously turned off.
By following these steps, you can replace or upgrade your RV battery with the confidence that it will improve the performance and reliability of your next adventure.
Related topics: Series and parallel connection of LiFePO4 batteries

Part 4. 5 reasons for converting your caravan battery to a lithium battery
Reason 1. Weight and size matter
RVs have a limited weight capacity, and every extra pound affects fuel efficiency and overall performance, so it's important to choose a lightweight battery that won't add unnecessary weight to your RV.
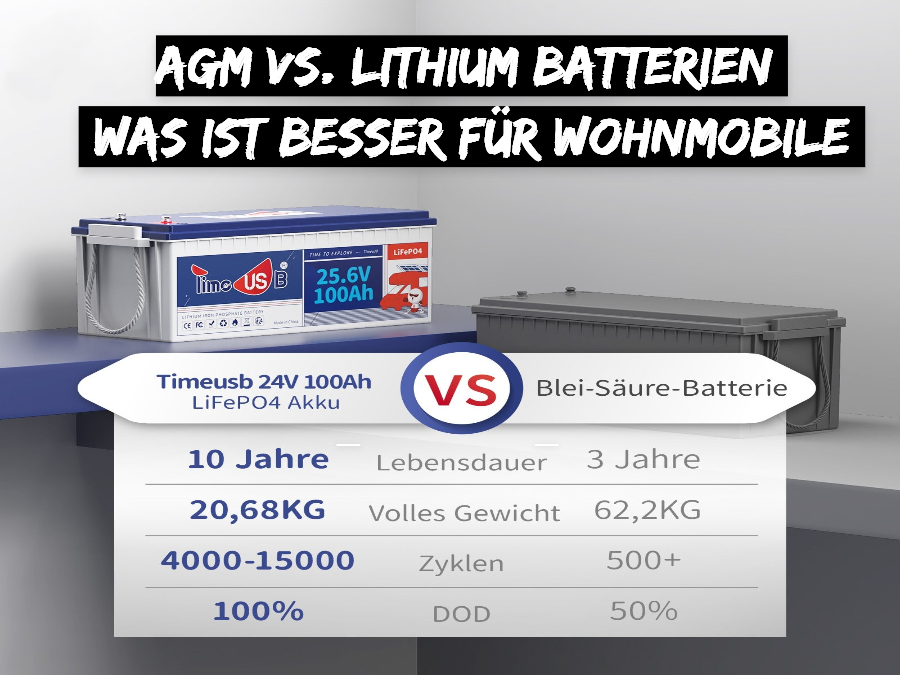
LiFePO4 batteries are an excellent choice due to their high energy density, allowing them to store a lot of energy in a small, lightweight package. LiFePO4 batteries are generally lighter and more compact than other battery types.The Timeusb 12V 100Ah Mini Group 24 Lithium Battery For example, weighs only 9.5 kg, while lead-acid batteries with similar capacity can weigh up to 29.48 kg - three times as much.

When choosing a battery, consider its effect on the overall weight distribution of the caravan. Uneven weight distribution can lead to stability and driving problems. It is important to distribute the weight evenly and avoid overloading one area.
Lightweight, compact batteries such as LiFePO4 batteries provide optimal performance and fuel efficiency while minimizing the impact on the RV’s weight capacity.
Reason 2. Fast charging is important
When traveling in an RV, especially if you are camping in the wilderness or off the grid, it is important to have quick battery charging to ensure your devices and equipment have enough power.
A slow charging battery will limit your ability to use your caravan's electrical system and you may have to wait longer to get back on the road. In contrast, a fast charging battery can be recharged quickly, allowing you to get back on your journey and enjoy it sooner.
Additionally, fast-charging batteries are useful if you have shore power. If you're staying in a caravan park or campsite with an electric hook-up, you can charge your batteries faster and more efficiently, saving you money on your electricity bill and reducing your carbon footprint.
LiFePO4 batteries charge 3-5 times faster than lead-acid batteries. 12V 100Ah LiFePO4 batteries take about 2-3 hours to fully charge, while 12V 100Ah lead-acid batteries can take 6-10 hours or more.
Reason 3. Longevity plays a big role
RVs are exposed to the elements and rough roads while traveling and are subject to a lot of wear and tear. Unstable batteries can become damaged or fail prematurely, leading to costly repairs and downtime.
Long-lasting batteries can withstand the rigors of RV life, including vibration, shock and temperature changes. This is especially important if you regularly drive on rough roads or off-road. A robust battery should be made of high-quality materials and a carefully constructed housing to protect it from damage and contamination.
Another important aspect is the lifespan of the battery. More durable batteries tend to last longer. LiFePO4 batteries last 3 to 5 times longer than lead-acid batteries. Lead-acid batteries have a lifespan of about 300-500 cycles (2-3 years), while LiFePO4 batteries can last up to 4000-15000 cycles (over 10 years).
Reason 4. Maintenance matters
The amount of maintenance required for your batteries can affect your entire camping experience. Batteries that require regular maintenance are inconvenient and time-consuming to manage.
Lead-acid batteries require regular maintenance, such as checking water levels, adding distilled water, and properly charging. Neglecting these tasks can result in shortened battery life or failure.
In contrast, LiFePO4 batteries are “maintenance free”. They do not need to be regularly checked for water levels or specially charged to ensure their longevity. This convenience makes them ideal for RV owners.
Reason 5. Safety first
One of the biggest safety concerns with batteries is overcharging or undercharging. Overcharging can cause the battery to overheat, which could result in a rupture or explosion. Undercharging may not provide enough energy, damaging the battery or other electrical components and reducing performance.
Another safety risk is the release of toxic gases during charging or use. Lead-acid batteries release hydrogen gas, which is highly flammable and can cause an explosion or fire if there is insufficient ventilation. Lithium ion batteries do not release toxic gases and are therefore safer to use in enclosed spaces such as caravans.
To ensure the safety of caravan batteries, please choose batteries with advanced safety features such as overcharge protection, thermal regulation and short circuit protection mechanisms. In addition, you should store and use the batteries in a well-ventilated area, away from heat or ignition sources.
By choosing a battery with advanced safety features and following guidelines for proper storage and use, you can minimize the risks of using batteries in your RV. Safe and reliable batteries give you peace of mind when you're on the road.
All Timeusb batteries are equipped with an integrated battery management system (BMS) that provides protection against overcharging, over-discharging, overcurrent, short circuit and high temperature.


